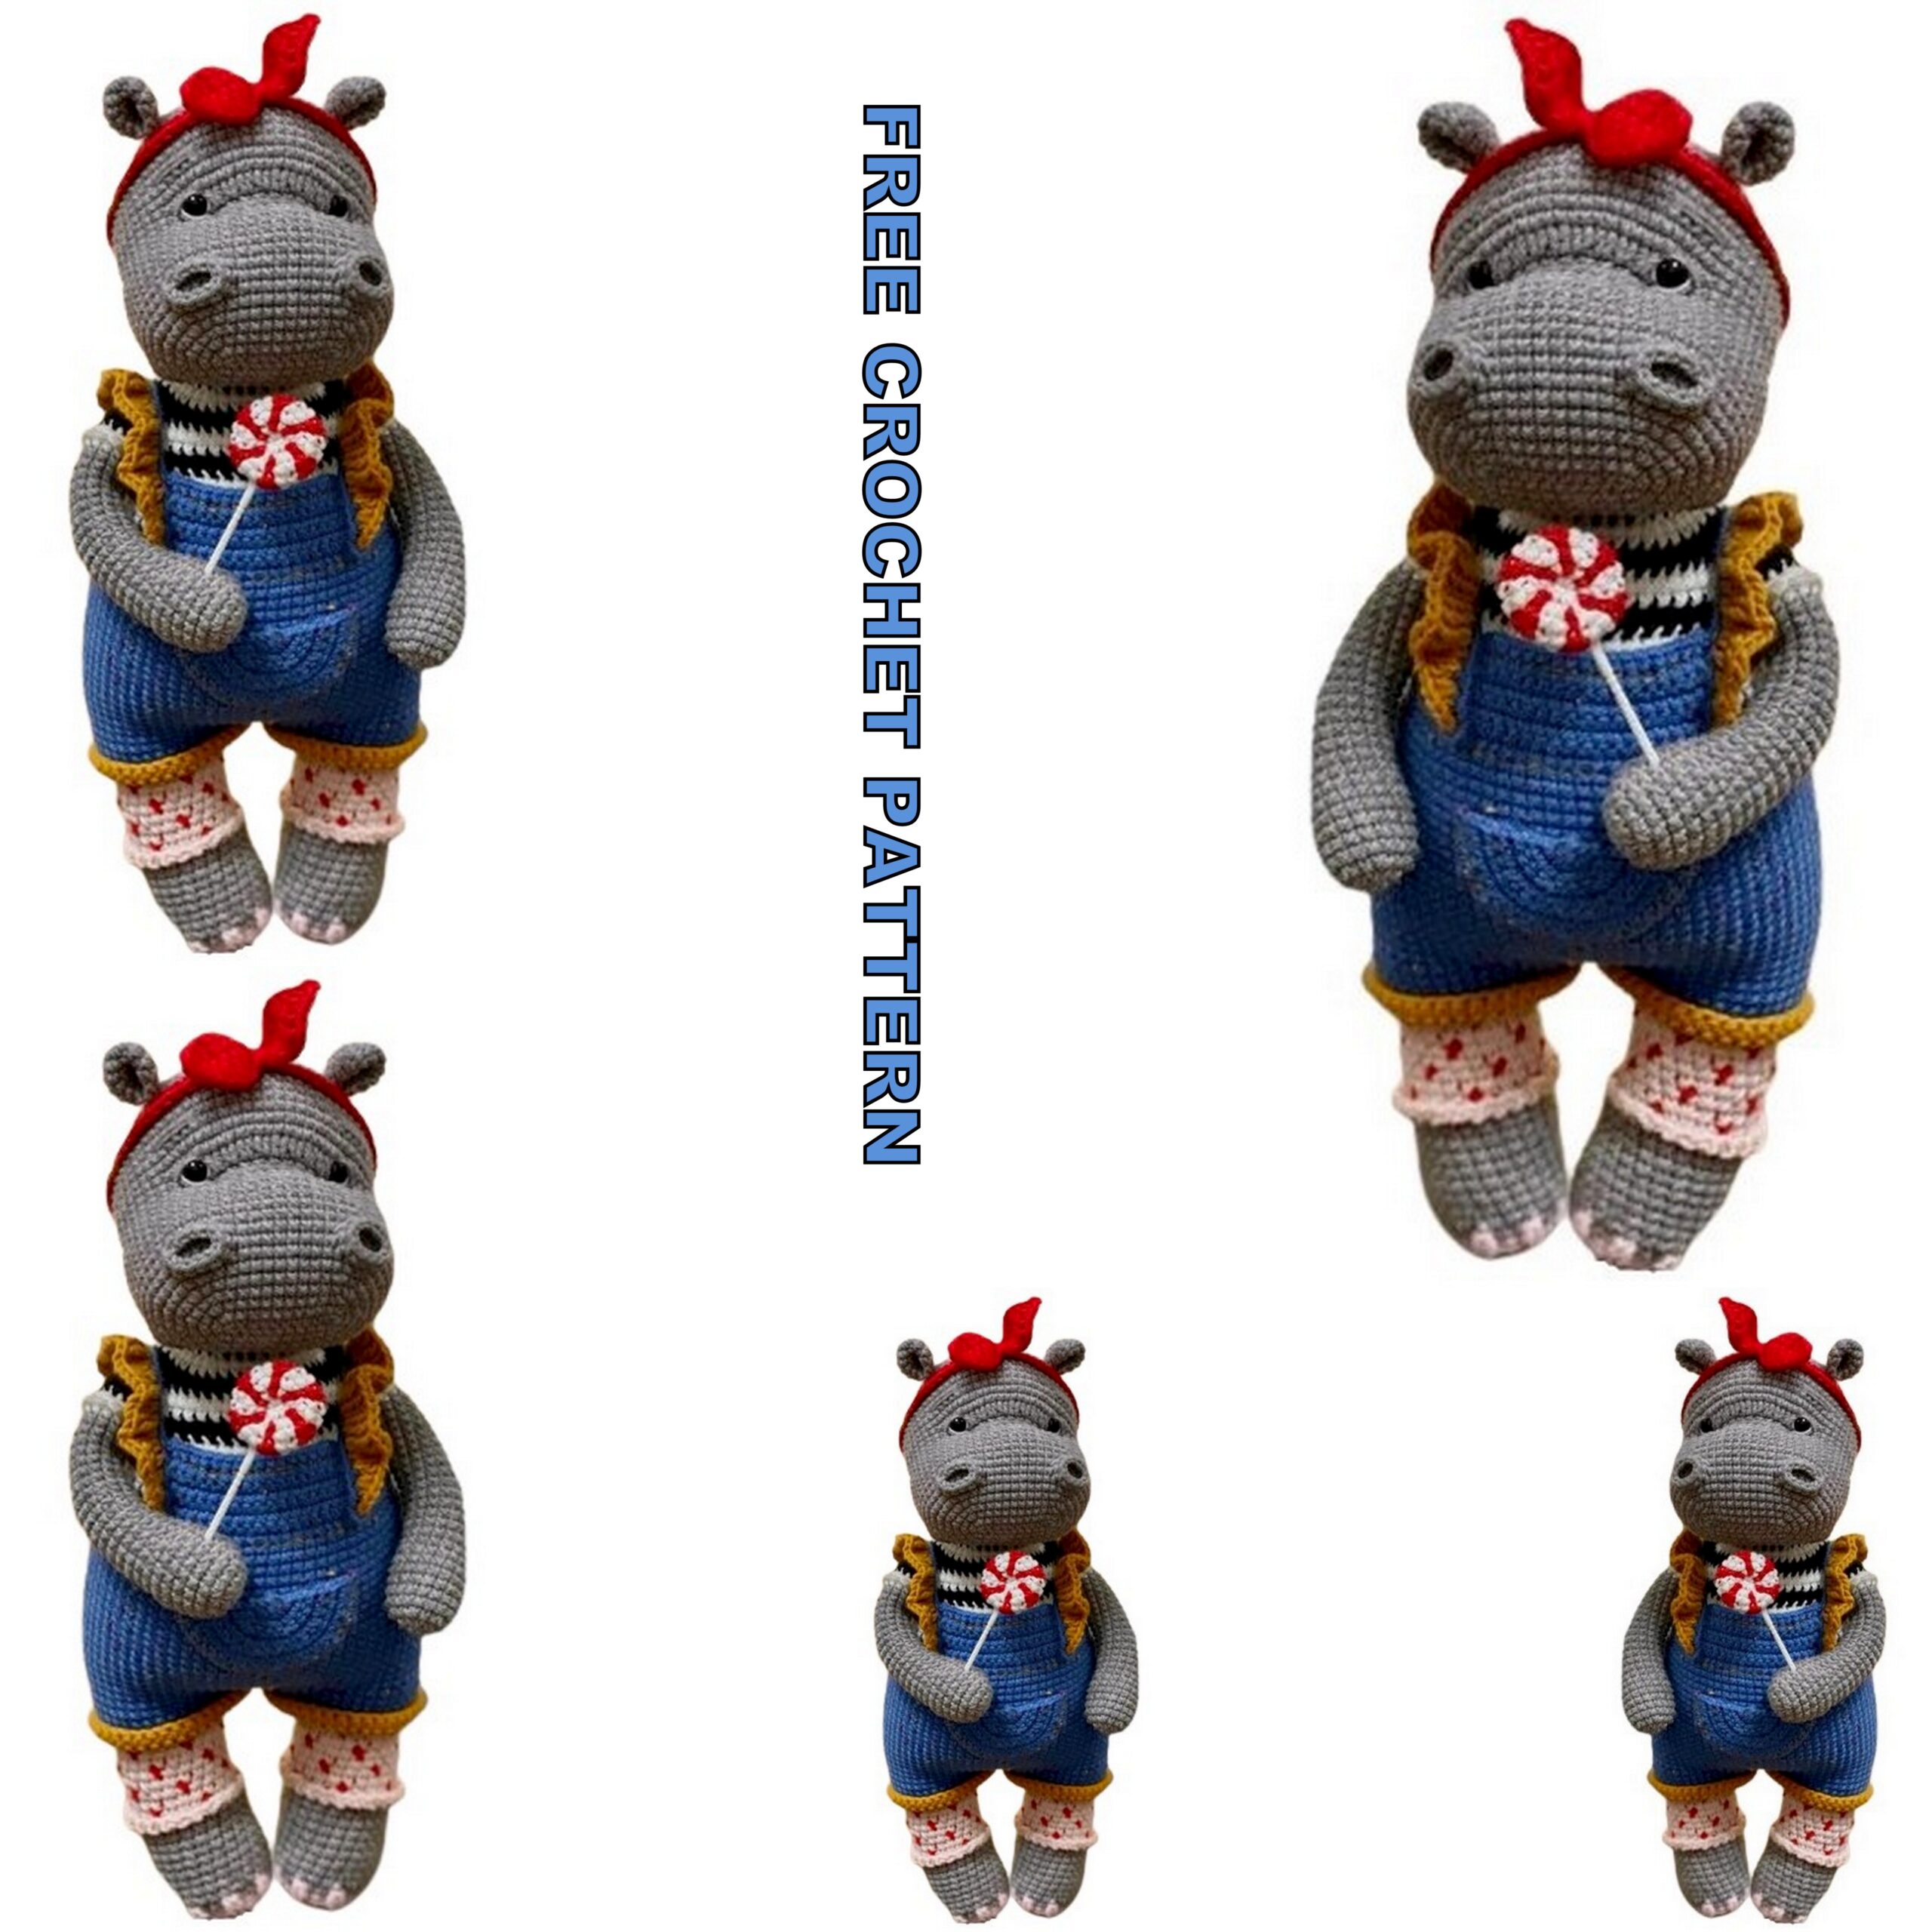
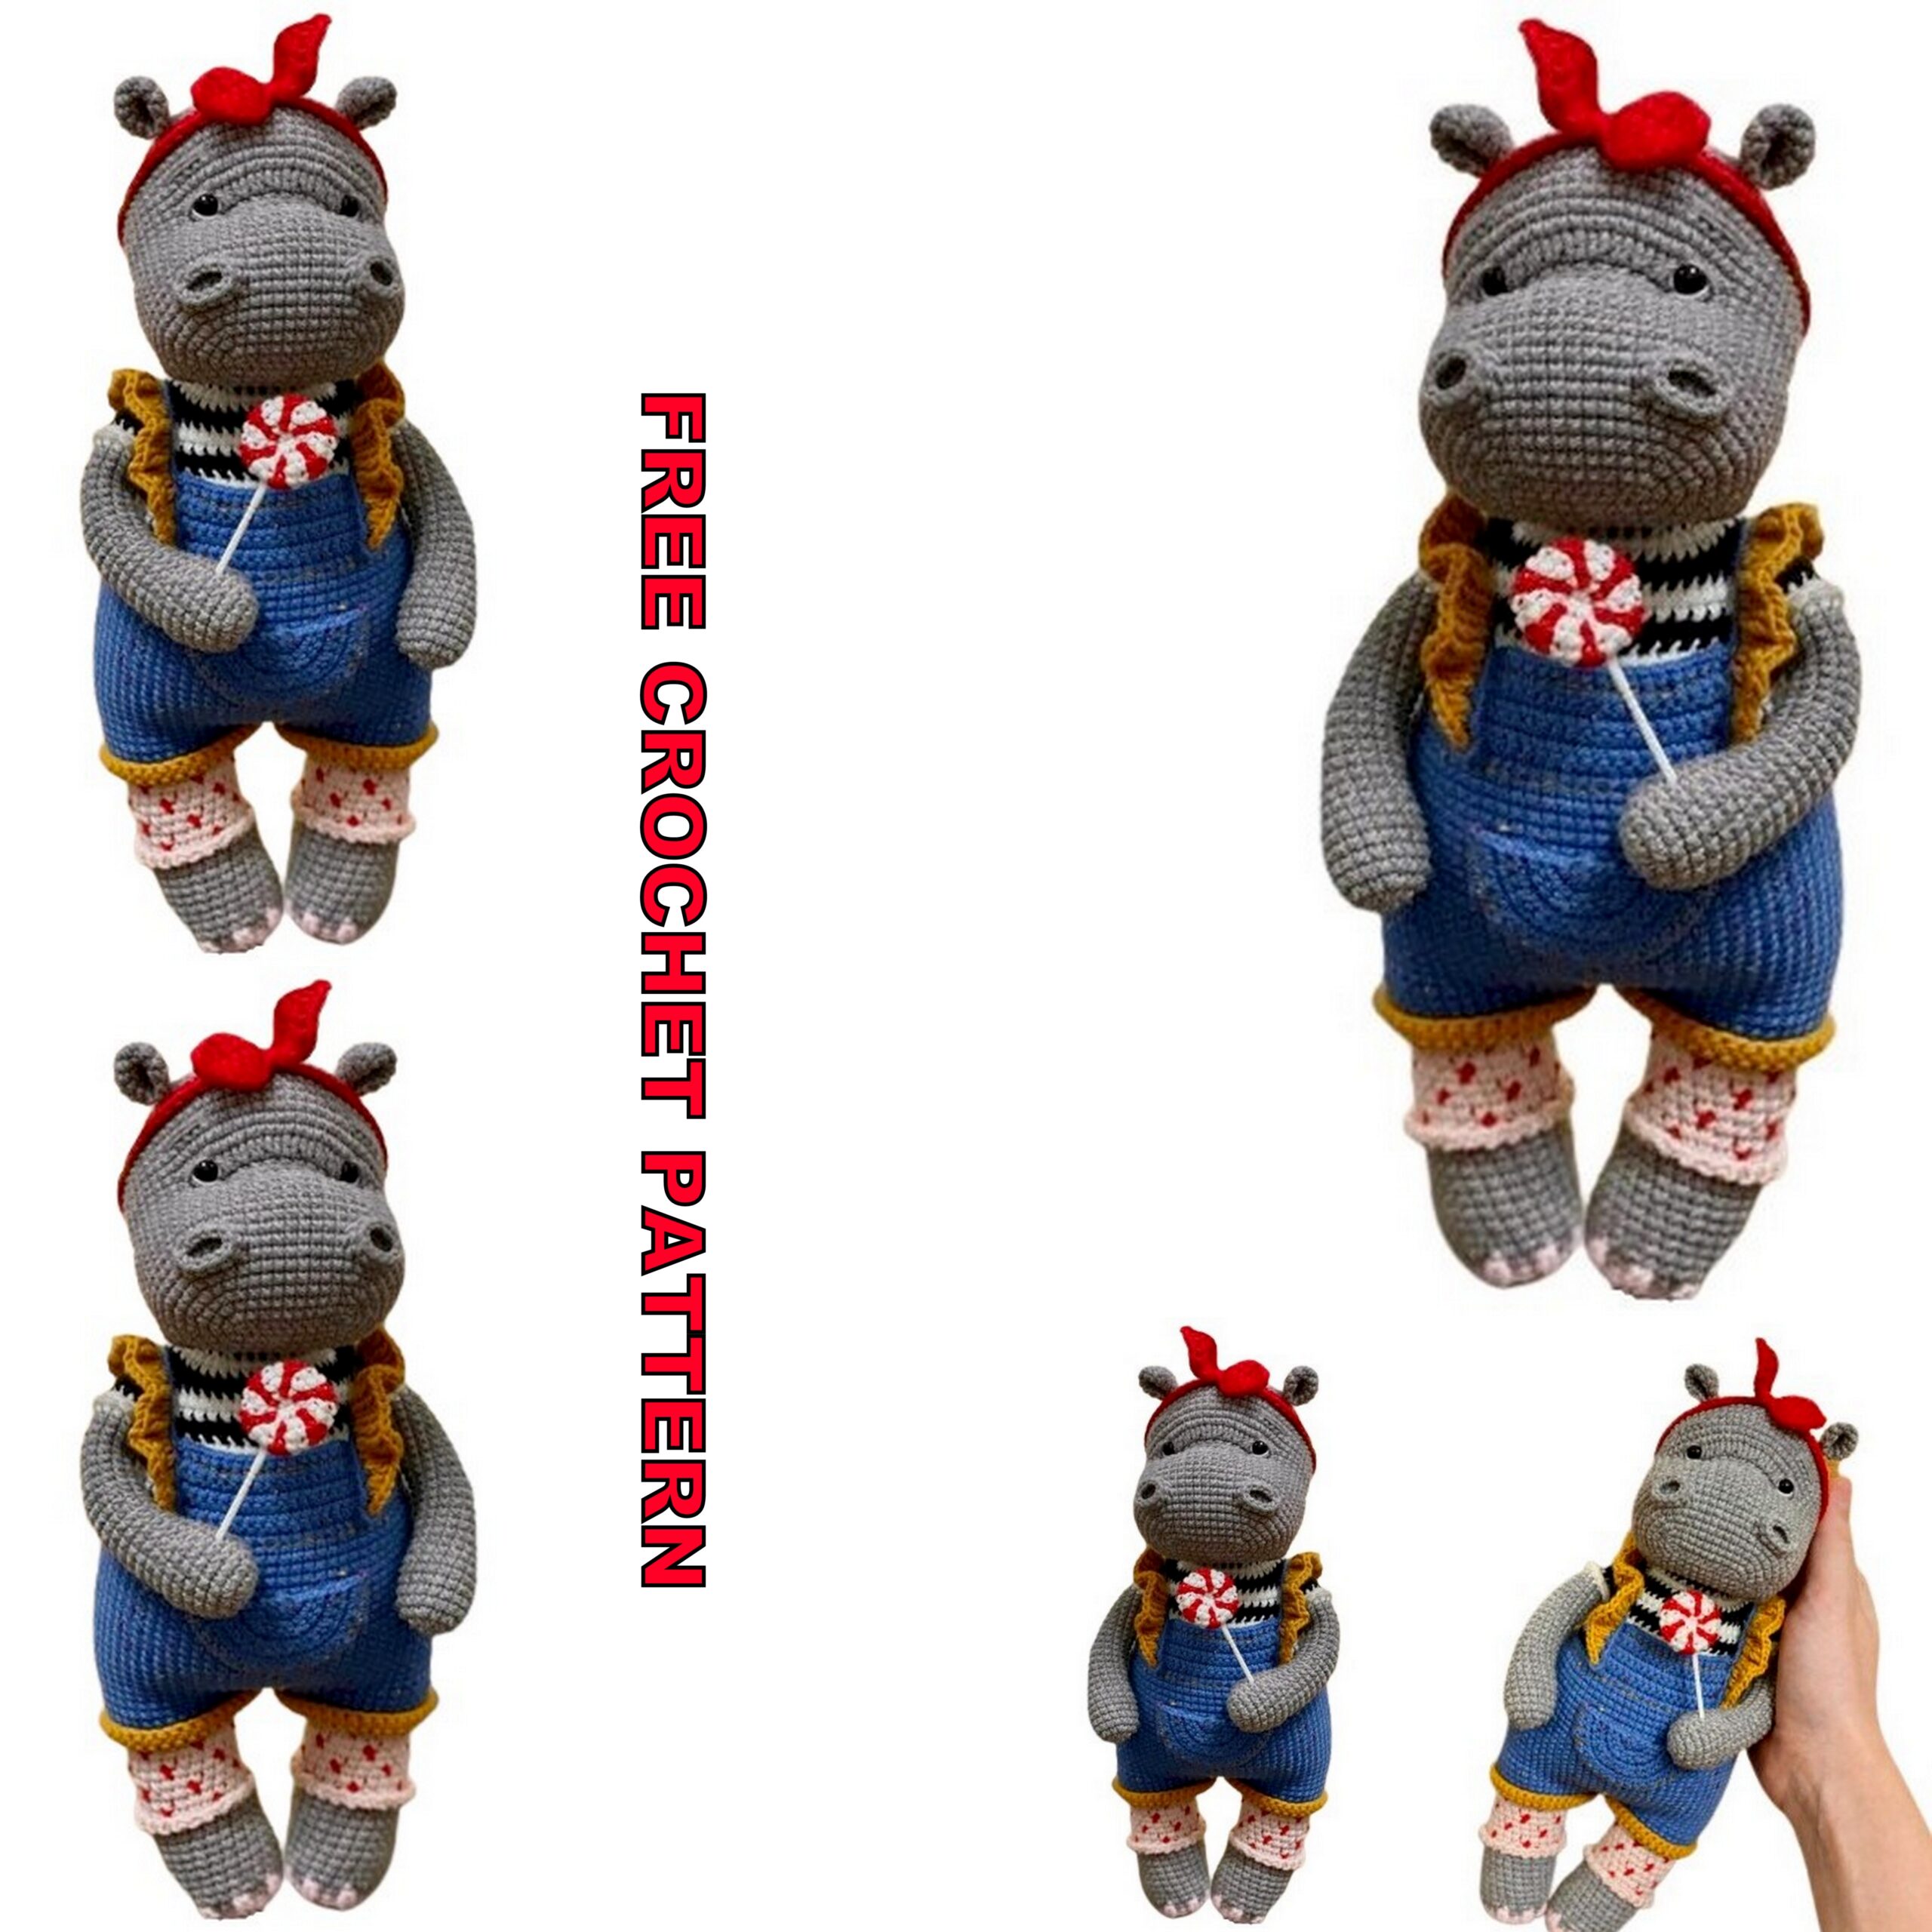
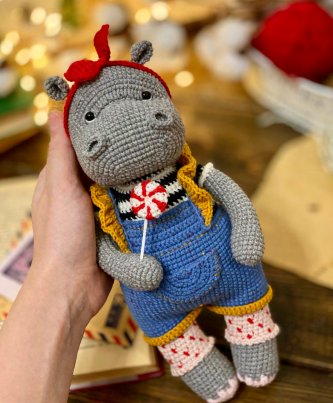
Hello dear Amigurumi Knitting Lovers,Today we share a free amigurumi crochet pattern for you.
As you know, we share new amigurumi free patterns every day. master crochets, amigurumi gazelles, amigurumi bears, amigurumi pola, amigurumi pandas, amigurumi penguins, amigurumi giraffes, amigurumi lama, amigurumi pigs, amigurumi rabbit, amigurumi clowns, amigurumi dolls, amigurumi unicorn, amigurumi elephants, amigurumi unicorn , amigurumi hippos, amigurumi monkeys, amigurumi cats, amigurumi dogs and more…
Don’t forget to subscribe to receive notifications of our new free recipes.
Today, the new daily crochet pattern Amigurumi Hippo Free Crochet Pattern, I want to give you some information about this pattern;
NECESSARY MATERIALS
Alize Cotton Gold 100g-330m
21 (gray)
56 (red)
60 (black)
382 (flesh pink)
393 (pink)
55 (white)
02 (mustard)
Alize Cotton Gold Tweed 100g-330m
236 (dark blue)
- Hook 1.75
- Eyes D7-8mm
- Filler (holofiber)
- Needle with a blunt end
- Scissors
- Strong thread for tightening
- Sewing pins
- Mustard colored sewing thread
- Toothpick for a lollipop
OPTIONAL (if you want a toy on a frame) - Insulating tape
- Wire
LOOP OF DISPLACEMENT
Very often in knitting there is such a term as a bias loop.
So what is this loop?
When crocheting, almost always the marker of the beginning of the row is shifted to
right side. It needs to be corrected and corrected. How is it do?
You just need to knit another 1sc at the end of the row and shift the marker for one loop.
The second loop becomes the first, and the first – the last.
This is the same displacement loop.
And the most important thing! This stitch is not counted when knitting.

SYMBOLS
magic ring – amigurumi ring
sc- single crochet
hdc-half glare double crochet
double crochet dc
s2n-column with two crochets
inc – increase
dec – decrease
ch- air loop
sl-st-connecting post
(…) – the number in brackets means the number of loops in the row
(…)*X- repeat X times what is in parentheses
HEAD
We knit with gray yarn. We collect a chain of 11 ch, from the 2nd loop from the hook:
- 9sc, 3sc in the last loop, on the other side of the chain 8sc, inc (22)
- inc, 8sc, inc3, 8sc, inc2 (28)
- 1sc, inc, 8sc, (1sc, inc) * 3, 8sc, (1sc, inc) * 2 (34)
- 1sc, inc, 10sc, inc, (2sc, inc) * 2, 10sc, inc, 2sc, inc, 1sc (40)
- 3sc, inc, 8sc, (3sc, inc) * 3, 8sc, (3sc, inc) * 2 (46)
- 2sc, inc, 12sc, inc, (4sc, inc) * 2, 12sc, inc, 4sc, inc, 2sc (52)
- 2sc, inc, 13sc, (inc, 5sc) * 2, inc, 13sc, inc, 5sc, inc, 3sc (58)
We knit another 11 sc, the marker of the beginning of the row will now pass in the middle of the upper part faces. Follow it! If necessary, knit bias stitches to even out marker.
Let’s start tying the mouth. - 21sc, ch 18, skip 16 sc of the previous row, 21 sc. (60)
- 21sc, 18sc in a chain of 18 ch, 21sc. (60)
- 60 sc. (60)

We pull the loop, leave the knitting of the muzzle, we begin to knit a mouth.
We take the thread from the middle of the hank (the other end
threads). Attach to the first skipped loop 8th row:
- 16sc, 1sc in the corner of the mouth, 18 sc in a chain,
1sc in the corner (36) - 36sc (36)
We cut the thread, we fix the end.

We twist the mouth (see photo below)

We continue to knit the head.
- 21sc, 18sc we knit, capturing 3 loops of the folded mouth, 21sc (60)

12-15. 60sc (4 rows)
- 4sc, dec, (8sc, dec) * 5, 4sc (54)
- 48sc, inc from hdc*6 (60)
- inc from hdc*6, 54sc (66)
19-26. 66sc (8 rows)
We insert eyes on a safe mount D7-8mm between 17 and 18 side by side at a distance of 5 inc from hdc from marker line left and right. - (9sc, dec) * 6 (60)
- 60sc (60)
29.4sc, dec, (8sc, dec) * 5, 4sc (54) - (7sc, dec) * 6 (48)
After this row, the marker can be ignored. At the same time, we leave the marker, do not pull it out,
because we will be equal to it when embroidering the nostrils and sewing on the ears. - 3sc, dec, (6sc, dec) * 5, 3sc (42)
- (5sc, dec) * 6 (36)
- 2sc, dec, (4sc, dec) * 5, 2sc (30)
We begin to gradually fill the head with filler. - (3sc, dec) * 6 (24)
35.1sc, dec, (2sc, dec)*5, 1sc (18) - (1sc, dec) * 6 (12)
- dec*6 (6)
We cut the thread, tighten the hole and hide the tip of the thread.
We make a tightening number 1. Insert the needle at point 1, withdraw to point 2, insert the needle at point 3, withdraw to point 4. Similarly, we make a tightening for the second eye (1-5-6-4). We fix the thread and hide.
We make a tightening number 2. Insert the needle at point 1, withdraw to point 3, insert the needle at point 5, withdraw to point 4. Points 1 and 4 located between 11 and 12 rows.

We embroider squirrels with a white thread, eyelids with a gray thread.
Nostrils: mark with pins the points between the 7th and 8th rows at a distance of 7sc from the marker.
We attach the thread and around each pin, picking up the loops, we knit 13sc (1 row) and
13sc (2nd row), sl-st, fasten the thread and hide. The first nostril is ready, we do the same and
from the second nostril.
We embroider the eyebrows with a gray thread.
With the help of dry pastels and a brush, apply a small blush to the cheeks.

EARS(2PCS)
We knit with gray yarn.
1.6sc in magic ring (6)
- inc*6 (12)
- (2sc, inc) * 4 (16)
4-5. 16sc (2 rows)
We fold the part in half and knit 8 sc for both loops.
We fix the thread, cut it off, leaving a long end for sewing parts.
We take the ear, fold it in half again and with the help of a needle and thread that we left in end of knitting, sew and sew to the head.

HANDS (2PCS)
We start knitting with gray yarn. We fill the handles in the knitting process to about middle.
- 6sc in magic ring (6)
- inc*6 (12)
- (1sc, inc) * 6 (18)
4-8. 18sc (5 rows) - (4sc, dec) * 3 (15)
10-25. 15sc (16 rows)
We change the yarn to white, the thread is gray cut, fix, hide. - 15sc (15)
- behind the back wall of the loop 15sc (15)
Change yarn to black
28-29. 15sc (15)
Change yarn to white
30-31. 15sc (15)
We change the yarn to black, cut the white thread, fasten, hide - 15sc (15)
We cut the thread, fasten it, hide it.
We attach a white thread to the front half loops of the 26th row and knit in a circle 15sc.
We cut the thread, fasten it, hide the ends (when knitting, the handle is directed away from us).

LEGS(2 PCS)
We start knitting with pink yarn. The marker of the beginning of the row passes behind the legs in the middle.
If necessary, we knit bias loops.
- 6sc in magic ring (6)
- inc*6 (12)
- (1sc, inc) * 6 (18)
- (2sc, inc) * 6 (24)
- behind the back wall of the loop 24sc (24)
We change the yarn to gray, do not cut the pink thread. - 8sc, with a pink thread we knit a bump from 2cn into one loop with a common top (bump
we knit for a half-loop of the 4th row), with a gray thread 2sc, a pink thread with a bump, a thread
gray 2sc, pink thread nub, gray thread 9sc (24)
We cut the pink thread, fasten it and hide it.

The half loop into which we knit a cone.
7-14. 24sc (8 rows)
At this stage of knitting, we need to align the marker, because when knitting jacquard loops.
We do not knit offsets (otherwise the pattern will shift).
We change the yarn to flesh-pink. Cut off the gray thread.
- 24sc (24)
In the next row, we begin to knit polka dots on leggings with red yarn. Next in it will be marked in red in the description. - behind the back wall of the loop 2sc, 1sc, (3sc, 1sc) * 5, 1sc (24)
- 24sc (24)
- (1sc, 3sc) * 6 (24)
- 24sc (24)
- 2sc, 1sc, (3sc, 1sc) * 5, 1sc (24)
- 24sc (24)
- (1sc, 3sc) * 6 (24)
- 24sc (24)
- 2sc, 1sc, (3sc, 1sc) * 5, 1sc (24)
- 24sc (24)
- (1sc, 3sc) * 6 (24)

We align the marker by knitting the required number of bias loops.
We cut the red thread, fasten it, hide it.
After aligning the marker, we knit additionally:
Right leg + 7sc. We cut the thread, fasten it, hide it.
Left leg + 17 sc. We do not cut the flesh-pink thread.
We stuff the legs with filler. If desired, use the frame.

We take the thread from the middle of the hank (the other end of the thread) of flesh-pink color. We join
to the front half-loops of the 15th row of legs and knit in a circle (2ch, sl-st) (when knitting legs keep away). We cut the thread, fasten it, hide the ends.

BODY
We take the left leg and continue knitting. We collect a chain of 6ch, 24sc on the right leg
(we join the leg in the first untied loop), 6sc along the chain from ch, 24sc on the left
leg, 6sc along the chain from ch. Next, we knit another 25sc, inc, 1sc and set in this place
marker. We will have it on the back in the middle on the back. If necessary in the future
we knit bias loops.

- inc, 1sc, inc, 24sc, (1sc, inc) * 3, 28sc (66)
- 5sc, inc, (10sc, inc) * 5, 5sc (72)
4-14. 72sc (11 rows) - 11sc, dec, (22sc, dec) * 2, 11sc (69)
- 69sc (69)
- (21sc, dec) * 3 (66)
We change the yarn to gray, cut the flesh-pink thread. We begin to gradually fill body filler. - behind the back wall of the loop 66sc (66)
- 10sc, dec, (20sc, dec)*2, 10sc (63)
We change the yarn to white, cut the gray thread. - 63sc (63)
- behind the back wall of the loop (19sc, dec) * 3 (60)
Change the yarn to black. - 60sc (60)
- 9sc, dec, (18sc, dec) * 2, 9sc (57)
Change the yarn to white. - 57sc (57)
- (17sc, dec) * 3 (54)
Change the yarn to black. - 54sc (54)
- 8sc, dec, (16sc, dec) * 2, 8sc (51)
Change the yarn to white. - 51sc (51)
- (15sc, dec) * 3 (48)
Change the yarn to black.
30-31. 48sc (48)
Change the yarn to white.
32-33. 48sc (48)
Change the yarn to black. We knit handles.
Make sure the start marker is level in the middle of the back. - 9sc along the body, take the left hand and knit simultaneously with the body 6sc, introducing a hook with wrong side of the arm, 18sc along the torso, 6sc we knit simultaneously with the right hand, introducing hook from the wrong side of the hand, 9sc along the body (48)


- 9sc on the torso, 9sc on the left hand, 18sc on the torso, 9sc on the right hand, 9sc on torso (54)

Change yarn to white
- (7sc, dec) * 6 (48)
- (4sc, dec) * 8 (40)
Change yarn to black - (3sc, dec) * 8 (32)
- (2sc, dec) * 8 (24)
Change yarn to white - 24sc (24)
We change the yarn to gray, cut the white and black thread. - behind the back wall of the loop 24sc (24)
- 24sc (24)
Next, we will knit one row of rotary. Make sure the marker is exactly in the middle backs. - 5sc, ch, unfold knitting, 10sc, sl-st.
We knitted this row so that the head was slightly tilted forward.
We cut the thread, leaving a long end for sewing parts.

Sew the head to the body.
We fix the head with the help of sewing pins in the position you like.
With the help of the thread that was left at the end of the knitting of the torso, we sew the details.

OVERALLS
We knit with blue yarn. Dial a chain of 74ch (Pay attention! The typed chain should be equal to the girth of the abdomen), connect into a ring and knit:
1-23. 74sc (23 rows)

After that, we start knitting trousers. Divide the total number of sc in half:
74/2=37sc – 1 leg.
From the last knitted loop, count 37sc counterclockwise and mark this loop marker.
We knit in a circle the first leg, starting with the marked loops:
24- 26. 37sc (3 rows)
Change to mustard thread, blue thread cut, clip and hide.
- behind the front wall of the loop 37sc (37)
- 37sc (37)
We cut the thread, fasten and hide.
Attach the blue thread to the first untied loop 23 rows and in a similar way
knit the second leg. We fasten the thread, cut it and hide.

Knit valve
To do this, with the help of markers, we mark 18 loops in the front in the middle. Attaching the thread
blue to the first marked loop and knit in turning rows:
1-6.18sc, ch, unfold knitting
- 18sc
Cut the thread, fasten
We knit straps.
To begin with, we will determine the place of their fastening on the back on the back and mark with markers. We join a blue thread in the first untied loop after the valve and knit 1 sc in each loop
to the first strap, then we collect a chain from ch to the required length of the strap (the strap should
reach the very bottom of the valve), and from the 2nd loop from the hook we knit 1 sc in each loop, then we knit up to 2 straps in each loop for 1sc, then we knit the second strap in the same way,
then we knit 1 sc into each loop to the beginning of the valve, then we tie the valve. A thread
cut, fasten, hide the tip of the thread.

We knit flounces on the straps.
We attach the mustard-colored thread to the strap from the side
- back (right strap)
-valve (left strap) and knit:
sl-st, 1sc, inc from pssn, inc from ssn, inc from s2n until there are 4 not knitted on the strap
loops, inc from dc, inc from hdc, 1sc, sl-st.

Knit pocket
We knit with blue yarn, turning rows.
1.3sc in magic ring (3), ch, unfold knitting
- inc * 3 (6), ch, unfold knitting
- (1sc, inc) * 3 (9), ch, unfold knitting
- (2sc, inc) * 3 (12), ch, unfold knitting
- (3sc, inc) * 3 (15), ch, unfold knitting
- (4sc, inc) * 3 (18), ch, unfold knitting
- (5sc, inc) * 3 (21), ch, unfold knitting
- (6sc, inc) * 3 (24)
We cut the thread, fasten it, hide the tip.
Let’s start assembling the jumpsuit:
We sew the straps to the valve with the thread that was used to knit the jumpsuit.
We sew the pocket with mustard-colored sewing threads.

We knit a bandage “solokha”
With red yarn, we collect a chain of 62ch, close the knitting in a circle and knit 62sc. A thread
cut, fasten, leaving a long end of the thread for sewing parts.
Next, we start knitting a bow. We collect a chain of 20ch, from the 2nd loop from the hook we knit:
slst, 1sc, 1hdc, 1sc, 2c2n, 1dc, 1hdc, 1sc, slst, 1sc, 1hdc, 1sc, 2c2n, 1dc, 1hdc, 1sc, slst, ch, by
other side of the chain slst, 1sc, 1hdc, 1dc, 2s2n, 1dc, 1hdc, 1sc, slst, 1sc, 1hdc, 1dc, 2s2n,
1dc, 1hdc, 1sc, slst. We cut the thread, fasten it, hide the tip of the thread.
With the help of the thread that was left at the end of the knitting of the bandage, we sew a bow. Bandage “solokha” ready.

We knit caramel
We start knitting with white yarn.
- 6sc in magic ring (6)
Next, add a red thread. Stitches that are knitted in red will be marked red. - (inc: 1sc, 1sc) * 6 (12)
- (inc, 1sc) * 6 (18)
- (2sc, inc) * 6 (24)
- (2sc, 2sc) * 6 (24)
- (2sc, dec) * 6 (18)
- (dec, 1sc) * 6 (12)
Cut the red thread, fasten. - dec*6 (6)
We cut the thread, leaving a long end. We tighten the remaining hole and tighten together
middle, passing the needle through the caramel.
If desired, you can insert into caramel toothpick, securing it with hot glue and sharpening
sharp edge file (for safety).
FINISH